
For most American stovetop coffee percolators, brew coffee for 5 to 10 minutes after the first perk begins. electric percolators often need 7 to 10 minutes, depending on the model and the amount of coffee.
Start timing when hot water first rises through the center tube and drips over the grounds. Do not count only the time it takes the water to heat.
A good batch should smell rich, look dark, and taste full without tasting burnt or bitter.
Quick Answer: How Long Should Coffee Percolate?
Use this simple guide:
| Percolator type | Typical percolation time | Best starting point |
|---|---|---|
| Stovetop percolator | 5–10 minutes | About 7 minutes |
| Electric percolator | 7–10 minutes | About 8 minutes |
| Small batch, 2–4 cups | 4–7 minutes | Check early |
| Large batch, 8–12 cups | 8–12 minutes | Check near the low end first |
These times assume cold water, medium heat for a stovetop model, and a normal coffee load. Your grind size, coffee amount, heat level, and percolator design can change the result.
What Does “Percolate Coffee” Mean?
Percolating is a brewing method in which hot water moves up a tube, spreads over ground coffee, and then flows back into the lower chamber. This cycle repeats until the coffee reaches the strength you want.
A percolator has three main parts:
- Lower chamber: Holds the water.
- Vertical tube: Carries hot water upward.
- Filter basket: Holds the ground coffee.
Many percolators have a clear knob in the lid. The knob lets you watch the water pulse over the grounds. This pulsing action is called “perking.”
Percolators brew at a higher temperature than many other coffee methods. The Specialty Coffee Association lists about 195°F to 205°F as a common brewing range for coffee. A percolator can move toward the high end of that range, especially when used over strong heat.
That high heat helps create a bold cup. It can also pull out too many bitter compounds if the coffee keeps brewing for too long.
How to Percolate Coffee the Right Way
Follow these steps for a balanced pot.
1. Add the water
Fill the lower chamber with fresh, cold water. Use the measurement marks on the pot when available.
Many American coffee makers use a “cup” that holds about 5 to 6 fluid ounces, not the 8-ounce cup used on a standard measuring cup. Check your percolator’s markings before measuring coffee.
2. Add the coffee grounds
Place the tube and filter basket into the pot. Add ground coffee to the basket.
Start with about:
- 1 tablespoon of coffee per 6-ounce cup of water
- Or ½ cup of ground coffee for a 12-cup percolator
Use less coffee if you prefer a lighter brew. Use a little more for a stronger cup, but do not pack the grounds tightly.
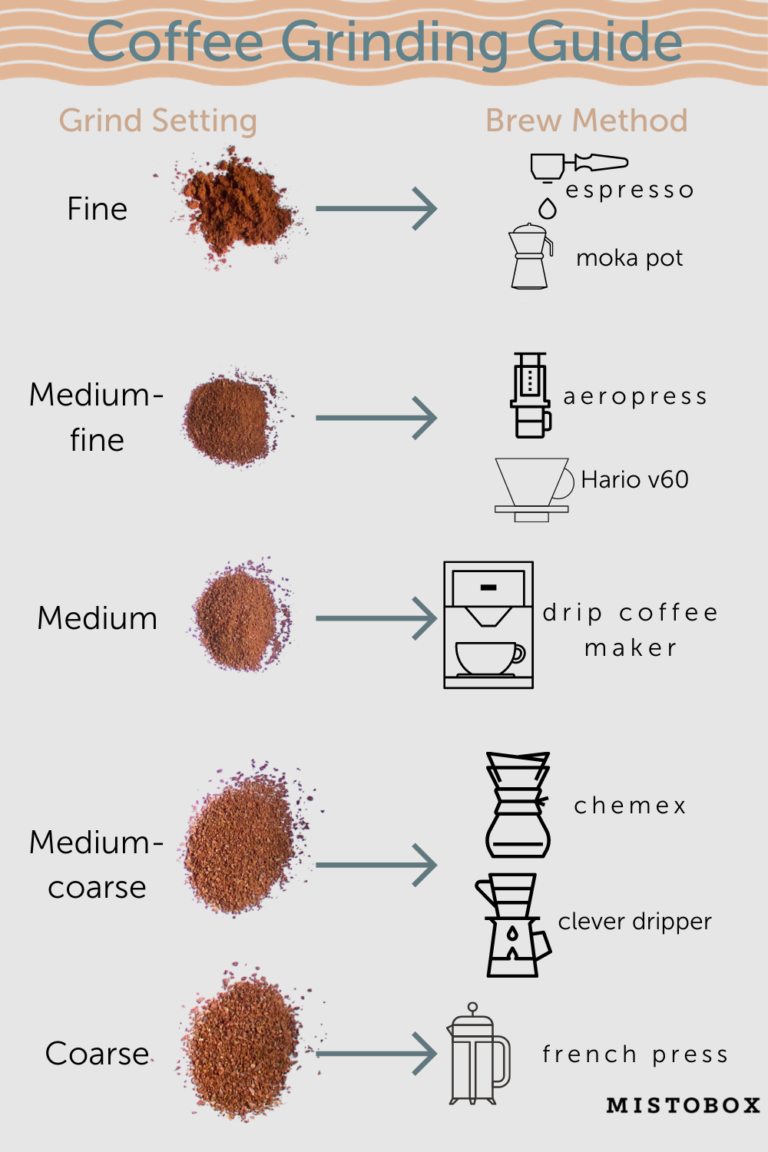
A coarse or medium-coarse grind works best. Very fine coffee can pass through the filter, clog the basket, or become harsh.
3. Assemble the percolator
Place the lid on the basket and secure the percolator lid. Make sure the tube sits correctly in the bottom of the pot.
For an electric model, plug it in and turn it on. For a stovetop model, place it on a burner.
4. Heat the water slowly
Use medium heat on a stovetop percolator. The goal is a steady perk, not a violent boil.
When the first drops appear in the top knob, lower the heat if needed. A gentle pulse every few seconds is a useful sign.
5. Start the timer
Begin timing when the coffee starts to perk.
Brew for 5 to 10 minutes. If you are using a new percolator, begin with about 7 minutes. Taste the coffee and adjust the next batch.
6. Stop the brewing
Remove a stovetop percolator from the heat when the time is up. Unplug an electric percolator.
Do not let the pot continue heating after brewing. Continued heat can make the coffee bitter and may create a scorched taste.
7. Let the coffee settle
Wait about 1 to 2 minutes before pouring. This gives the coffee grounds time to settle and makes the first pour smoother.
Use a heat-safe surface and handle the pot carefully. The coffee, metal body, and steam can all cause burns.
How to Know When Percolated Coffee Is Done
Time is useful, but your senses can help you fine-tune the brew.
Coffee is usually ready when:
- The coffee has a rich, full smell.
- The color in the top knob has changed from clear water to dark coffee.
- The perking sound is steady but gentle.
- The brew tastes full and rounded.
- The coffee does not taste sharp, dry, or burnt.
The clear knob is not a perfect strength meter. It can show that coffee is moving through the basket, but it cannot measure extraction. Use it with the timer and taste.
If the coffee smells burnt before the timer ends, the heat may be too high. If it tastes thin after 5 minutes, the grind, coffee amount, or water level may need adjustment.
What Changes the Percolation Time?
The correct brewing time depends on more than the clock.
Heat level
High heat brings water to the basket quickly, but it can make the coffee boil too hard. This may lead to bitter flavor and uneven extraction.
Medium heat is a better starting point for stovetop models. After the first perk, lower the heat enough to maintain a calm, steady cycle.
Amount of coffee
A full pot may need more time than a small batch. However, doubling the amount of water does not always mean you should double the brewing time.
For a small batch, check the flavor after 4 to 6 minutes. For a large batch, begin checking around 7 to 8 minutes.
Grind size
Grind size affects how quickly water moves through the coffee.
| Grind | Likely result in a percolator |
|---|---|
| Fine | Slow flow, sludge, bitter taste |
| Medium | Strong extraction, but may become harsh |
| Medium-coarse | Good starting point |
| Very coarse | Fast flow and weak coffee |
A medium-coarse grind is often the safest place to start. If the coffee tastes weak, use slightly finer grounds or more coffee. If it tastes bitter, use a coarser grind or shorten the brew.
Coffee-to-water ratio
More coffee grounds usually increase strength. They do not always require a much longer brewing time.
Try adjusting the ratio before extending the percolation period. Long brewing can increase bitterness faster than it improves body.
Water temperature
Water that is too cool may produce weak coffee. Water that stays near a boil for too long can overextract the grounds.
This is why a gentle perk works better than a hard boil.
Coffee freshness
Fresh coffee usually gives a better aroma and flavor. Old or stale coffee may taste flat, even when the brew time is correct.
Store ground coffee in a sealed container away from heat, light, and moisture. Grind whole beans shortly before brewing when possible.
Stovetop vs. Electric Percolator Timing
Stovetop and electric percolators use the same basic process, but they need different attention.
Stovetop percolator
A stovetop percolator usually takes about 5 to 10 minutes after perking starts.
Use these steps:
- Heat the pot over medium heat.
- Watch for the first perk.
- Reduce the heat to keep a gentle cycle.
- Brew for about 7 minutes.
- Remove the pot from the burner.
- Let it rest for 1 to 2 minutes before serving.
Stovetop models need more monitoring. The burner may keep heating the pot even after the coffee reaches full strength.
Electric percolator
An electric percolator often takes 7 to 10 minutes after the first perk, though many models are designed to stop or switch to a warming mode automatically.
Follow the manufacturer’s instructions when they differ from general timing advice. Some electric models use a thermostat, a ready light, or an automatic shutoff.
Do not assume that every electric percolator stops at the same strength. Some keep the coffee warm, and prolonged warming can affect flavor.
A Simple Timing Formula
For a practical starting point, use this method:
Percolation time = about 1 minute per cup, with a usual range of 5 to 10 minutes
This is only a starting estimate. For example:
- 4 cups: about 4 to 6 minutes
- 6 cups: about 6 to 8 minutes
- 8 cups: about 7 to 10 minutes
- 10 to 12 cups: about 8 to 12 minutes
Do not extend the time without limit for a larger pot. The coffee can become bitter before every extra minute adds useful strength.
A better approach is to begin at the low end, taste the coffee, and adjust the next brew.
How to Fix Weak or Bitter Percolator Coffee
Change one variable at a time. This makes it easier to find the cause.
If the coffee tastes weak
Try one of these changes:
- Add a small amount of coffee grounds.
- Use a slightly finer grind.
- Check that the tube and basket are seated correctly.
- Brew for 1 to 2 minutes longer.
- Make sure the water level is correct.
- Use fresh coffee.
Do not jump straight to a very long brew. Weak coffee may come from too much water or too few grounds rather than too little time.
If the coffee tastes bitter
Try these changes:
- Shorten the brewing time.
- Lower the stovetop heat.
- Use a coarser grind.
- Reduce the coffee dose slightly.
- Stop the warming cycle after brewing.
- Clean old coffee oils from the basket and pot.
Bitterness often means the coffee received too much heat, too much contact time, or both.
If the coffee tastes burnt
A burnt taste usually points to excessive heat or prolonged warming.
For a stovetop model, lower the burner after the first perk. For an electric model, remove the pot from its warming base when practical, unless the manual says the unit must remain there.
Never leave a stovetop percolator unattended on a hot burner.
If coffee grounds appear in the cup
The grind may be too fine, or the filter basket may be damaged. Try a coarser grind and inspect the basket for cracks or loose parts.
Do not use a damaged percolator. Replace worn parts with ones made for that model.
Common Percolator Mistakes to Avoid
Using finely ground coffee
Fine grounds can slip through the basket and create muddy coffee. They may also slow the water flow.
Packing the basket
Pressing down the grounds blocks water movement. Add the coffee loosely and level it without tamping.
Boiling the coffee hard
A hard boil can damage flavor and make the coffee taste harsh. Aim for a gentle perk.
Brewing for 20 minutes or longer
Long brewing does not automatically create better coffee. It often produces a bitter, dry cup.
Leaving coffee on heat
Percolated coffee can continue to darken and lose flavor while sitting on a hot base or burner.
Using the wrong water amount
Too little water can make the coffee overly strong. Too much water can make it thin. Use the pot’s cup markings, then adjust the coffee amount to match your taste.
Skipping cleaning
Coffee oils build up inside the basket, tube, lid, and pot. These old oils can make fresh coffee taste stale or bitter.
Wash removable parts after each use. For mineral buildup, follow the manufacturer’s cleaning instructions. Many stainless-steel percolators can be cleaned with a suitable vinegar-and-water method, but confirm the manual first.
How Much Coffee Should You Use in a Percolator?
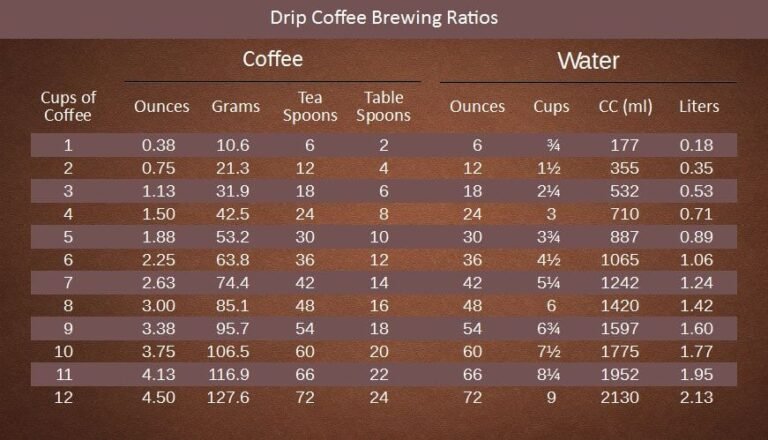
A useful starting ratio is 1 tablespoon of ground coffee for each 6-ounce cup of water.
Here are sample amounts:
| Water in the percolator | Starting coffee amount |
|---|---|
| 4 cups, about 24 ounces | 4 tablespoons |
| 6 cups, about 36 ounces | 6 tablespoons |
| 8 cups, about 48 ounces | 8 tablespoons |
| 10 cups, about 60 ounces | 10 tablespoons |
| 12 cups, about 72 ounces | 12 tablespoons |
These amounts are not fixed rules. Coffee strength depends on the bean, roast, grind, and personal taste.
If the coffee tastes too strong, reduce the grounds slightly before shortening the brew too much. If it tastes too weak, increase the grounds slightly before using a much finer grind.
Is Percolated Coffee Stronger Than Drip Coffee?
Percolated coffee often tastes stronger because the brewing cycle repeatedly sends hot water through the grounds. This can create a heavier body and a more intense flavor.
“Stronger” can mean two different things:
- Stronger taste: More bold, dark, or bitter flavor.
- More caffeine: A higher caffeine amount in the serving.
The result depends on the coffee amount, serving size, brewing time, and bean type. A bold taste does not always mean more caffeine.
If you want a stronger cup without adding much bitterness, try using a little more coffee rather than percolating for a much longer period.
Safety Tips for Using a Coffee Percolator
Percolators contain hot water, hot coffee, steam, and heated metal. Use care during and after brewing.
- Place the percolator on a stable, heat-safe surface.
- Keep the cord away from hot burners.
- Do not open the lid while the pot is actively perking.
- Use the handle when pouring.
- Keep children away from the pot and burner.
- Do not heat an electric percolator on a stovetop.
- Do not operate an electric model if the cord or plug is damaged.
- Follow the manual for water levels and cleaning.
- Never run a percolator without enough water.
- Unplug the electric unit before cleaning it.
If the percolator leaks, sparks, smells like burning plastic, or shows damage, stop using it and replace or repair it according to the manufacturer’s guidance.
Frequently Asked Questions
Can you percolate coffee for too long?
Yes. Brewing beyond the needed time can make coffee bitter, dry, and harsh. Start with 5 to 7 minutes after the first perk, then adjust based on taste.
Should coffee percolate on high heat?
No. High heat can make the water boil too hard and may burn the coffee. Use medium heat to start, then lower it after the first perk.
What is the best grind for percolator coffee?
Use a coarse or medium-coarse grind. Avoid very fine grounds because they can pass through the basket and create bitter, muddy coffee.
Can you use regular ground coffee in a percolator?
Yes, but coffee sold as “regular grind” may be finer than ideal for some percolators. If the cup tastes muddy or bitter, try a coarser grind.
How long should coffee sit in a percolator after brewing?
Let it rest for about 1 to 2 minutes before pouring. Avoid leaving it on active heat for a long time because the flavor may become bitter.
Key Takeaways
- Percolate coffee for 5 to 10 minutes after the first perk.
- Start with about 7 minutes for a stovetop model.
- Use 7 to 10 minutes as a starting range for many electric percolators.
- Choose a coarse or medium-coarse grind.
- Use about 1 tablespoon of coffee per 6-ounce cup of water.
- Keep the perk gentle, not violent.
- Stop heating when the coffee tastes full but not bitter.
- Adjust coffee amount, grind, heat, and time one at a time.
Conclusion
The best percolator coffee usually comes from a gentle brew of about 5 to 10 minutes after perking begins. Start near 7 minutes, use medium-coarse grounds, and watch the heat closely.
If the coffee tastes weak, add a little more coffee or extend the brew slightly. If it tastes bitter or burnt, reduce the heat or shorten the brewing time. Small changes can turn a harsh cup into a rich, smooth pot.
Sources
- National Coffee Association: How to Brew Coffee
- Specialty Coffee Association: Coffee Brewing Handbook and Standards
- Follow the care, water-level, timing, and safety instructions supplied with your specific percolator model.
One Comment